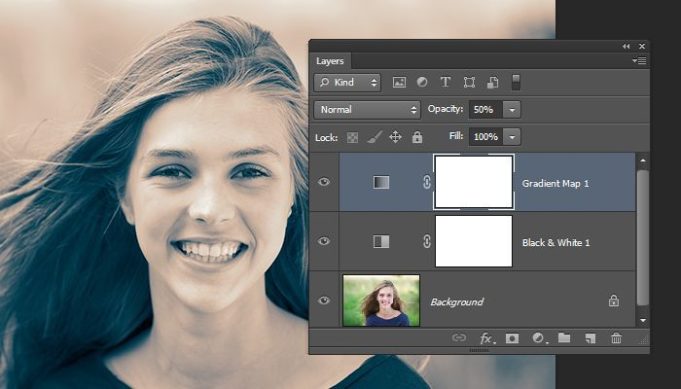
Color is different than black and white. Color has hue and saturation where black and white has tone and shades of gray. The hues in color do not translate directly to black and white. The relationship between colors is important to render for an accurate representation of the color image. Therefore, it is necessary to use some manipulation to change the color image into a black and white image.
A color image can be converted to black and white by using Lightness in Lab mode, the Channel Mixer, Gradient Map, Black and White Adjustment Layers or Hue/Saturation layers. There are many other ways, but these methods seem to produce the highest quality results.
Grayscale and Desaturate
In Photoshop, it is possible to change the color mode to Grayscale or Desaturate the image from the Adjustment and Mode menus on the main Toolbar. This method does not give the best results. Using the automatic functions does not take into account the variations in hues and colors. This will give the image a flat and toneless look.
Gradient Map
-Open the color image in Photoshop.
-On the Layers Palette, go to the Create New Adjustment Layer button at the bottom of the palette and click on Gradient Map.
-This step is easy and looks OK for some images.
There is some loss of mid gray tones and the image has a high contrast. If the object in the picture has a large area in the mid-tone gray range, this would not be the method to use. This is a fast and easy way to change a color image into black and white. This would work for some uses, but not for art prints.
Lightness in Lab
-First, convert the color image to Lab by selecting Image>Mode>Lab.
-Then, in the Channels Palette select the Lightness layer. Make a copy of this layer by choosing Select>All then Edit >Copy. Or, use the keyboard commands Cmd A and Cmd C (Mac) or Ctrl A and Ctrl C (Windows).
-In the History Palette, go back to the original image in RGB.
-Next, in the Channels Palette, select each channel individually and copy the Lightness copy into that channel by selecting Edit>Paste or Cmd V (Mac) and Ctrl V (Windows).
-Now return to the RGB layer.
If the image looks a little light or flat, a curves layer can be added. This is an easy and quick method for getting good results.
Hue/Saturation Layers
This method makes use of the all the colors used as filters on the image.
-Open the color image and make two adjustment layers with Hue/Saturation by clicking on the New Adjustment Layer button at the bottom of the Layers Palette and selecting Hue/Saturation.
-Name the first (or top layer) Grayscale and the next layer (or bottom layer) Sliders.
-In the Grayscale layer set the saturation to -100 in the Dialog Box (Figure 4). This will turn the image into a grayscale image.
-Now, select the slider layer and in the Dialog Box Edit menu go through the colors and change the Lightness using the slider.
Depending on the original colors of the image, the effects will change the tones and contrast of the image. This method gives more control and is easy to use. Flatten the image when all the corrections have been made. The last step is to Desaturate the image by selecting Image>Adjustments>Desaturate from the menu bar.
Channel Mixer
The Channel Mixer uses the Red, Green and Blue channels to control the brightness of the image.
-Open the color image in Photoshop.
-Go to Image>Adjustments>Channel Mixer.
-In the Dialog Box click on Monochrome in the lower left corner.
-Using the Red, Green and Blue sliders adjust the image till the desired results are achieved.
-The number of the three channels should add up to 100 to retain the brightness.
Black and White Adjustment Layers
While the Channel Mixer’s adjustments are global, the Black and White Adjustment Layer works with the individual colors within the image. This gives more control on specific colors and sections in the image.
-In the Layers Palette click on the New Adjustment Layer button at the bottom of the palette, select Black and White.
-This will open a dialog box and convert the image to black and white.
-In the dialog box, go through each color slider and see how the image is affected. Move the sliders till the desired result is achieved.
These techniques offer a variety of different ways to achieve good results. Every image is unique in the quality and relationship of colors and hues. Therefore, each image will need different adjustments. That is why it is important to always start with an image that is cleaned up and white balanced.


